To GameComponent or not to GameComponent

XNA provides a neat little system for you to organize your game’s different parts in: GameComponents. You can use them to modularize your game’s subsystems, eg. have a GuiComponent, PhysicsComponent, SceneGraphComponent etc. so you avoid having all that code in your Game class, or can use them for your actual game objects in smaller games.

However, the GameComponent and DrawableGameComponent classes provided by XNA force you to reference the Game class. This is unfortunate if you want to use those components in a WinForms-based XNA application and gets in the way when you try to write unit tests for your components because now you have to create a dummy Game instance as well (and better hope that component won’t go shopping for references in the Game‘s Components and Services collections as well).
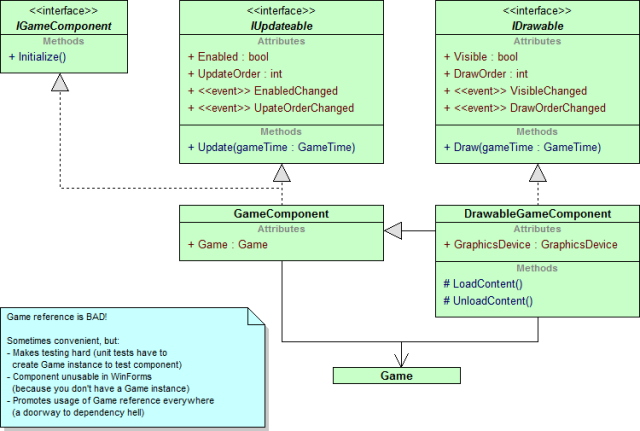
UML class diagram of the GameComponent and DrawableGameComponent classes

Luckily, the GameComponentCollection used by XNA to store your components manages IGameComponents and updating/drawing are based on the IUpdateable and IDrawable interfaces alone, so there’s nothing preventing you from rolling your own components without referencing the Game class.

Read More

Using Ninject with SunBurn

First, let me say sorry if I seemed to be absent for the past months. I was quite burned out and didn’t want to do much with computers during that time :).

My “XNA Game Architecture” series was left hanging, and right when it got interesting, too. I’ll try to find the time to continue where I left off. For now, here’s a small appetizer:

The letter N constructed from overlapping blue wave functions

Some weeks ago, Synapse Gaming offered their SunBurn Lighting and Rendering Engine for half the price. This was too good an offer to pass and so I now find myself being able to do much better lighting effects than I had ever hoped to achieve in my game.

The first thing I did was, of course, to adapt SunBurn to Ninject, a very tidy dependency injector that works on the XBox 360 and even on Windows Phone 7, into the SunBurn example application. This article gives a short overview about the overall structure and provides you with an example application if you want to give Ninject a try yourself.

Read More

AeroCapture

Whenever I needed a screenshot of some application for this website, I used an image editor to cut out the window’s drop shadow, generated an alpha channel from its luminance, added that as a layer behind the actual application window and saved the entire thing again.

Today I wrote a small utility to automate this process for me: AeroCapture. Pressing the “Print Screen” key will take a screenshot of the active window, and save it as a .png in the My Pictures directory, retaining the window’s drop shadow in the image’s alpha channel.

Screen capture of a small window showing a clip art of a digital camera

You can download it here: [rokdownload menuitem=”17″ downloaditem=”42″ direct_download=”true”]AeroCapture.7z[/rokdownload] (C# source code included)

This got me thinking. Somehow, whenever I have the choice between…

  • spending 2 minutes doing a repetitive task that I’ve done a few dozen times before already (like fixing up the screenshot for my website)
  • or spending 4 hours to automate the task

…I always choose the 2 minutes approach. I can continue working on what I was planning to do and I don’t have as many utilities to maintain.

What do you do in this situation?

The logo used by Microsoft for .NET 4.0, a wavy letter N accompanied by the text "Microsoft .NET"

Visual Studio 2010

Two weeks ago, Microsoft released Visual Studio 2010 and with it, .NET 4.0.

I’m very excited about .NET 4.0 because this is the first standalone release of .NET since 2.0 came out, meaning that it doesn’t bundle any of the older runtimes. As you may know, .NET 3.5 is actually just .NET 2.0 with some more assemblies – all the magic required for LINQ, extension methods and lambda expressions happens in the compiler.

The letter N constructed from overlapping blue wave functions

The new Visual Studio UI also looks very nice and the darker background puts the actual work (the code) into focus. But there have been some changes like the apparent removal of the Debug/Release combo in the toolbar and the ability to add your own External Tools to the Tools menu in the Express Editions (don’t worry, both are still there, I explain how to enable them a bit down in this article).

So I decided to write a small heads-up on why I think Visual Studio 2010 and .NET 4.0 are cool and how to get back your favorite options if you’re already used to the Visual Studio 2008 Express Editions.

Read More

VirtualBox on Headless Gentoo

Being an adherent of Continuous Integration, I need a build machine that runs round the clock even when my workstation is turned off. As I’m running a small home server, this wouldn’t be an issue — if it weren’t for the fact that my home server runs Linux and 99% of my development happens in Windows. So I use virtualization to run a small Windows system on top of my home server.

In the past I used VMware for this job. VMware worked well for me and performance was quite good, but now that I’ve switched to a fully headless system, I noticed that the vmware-server package pulls in most of the X11 libraries – which I’m not particularly keen on having on my system due to their compile times.

A cube mounted like a display showing the Sun logo

So I went shopping for some alternatives. KVM sounded interesting (and was the leanest virtualization solution I could find), but the Gentoo Wiki stated that Windows didn’t work in qemu with recent kernels, so I went looking on – and found VirtualBox. This article explains how to set up VirtualBox on a headless Gentoo system.

Read More

Installing TeamCity on Gentoo Linux

If you haven’t heard of Continuous Integration yet, it’s the practice of setting up an automated system that rebuilds projects automatically whenever someone commits a new change to your source code repository. It ensures that whatever is in your repository builds and runs: automated builds usually involve compiling, running unit tests and packaging the installer.

Official TeamCity logo depicting a blue T and orange C

To do continuous integration, you need a tool that monitors your source code repository and starts the builds – a continuous integration server. My weapon of choice is TeamCity, a free CI server written in Java with first-class support for .NET and its toolchain (like NAnt, NUnit, NCover or PartCover).

TeamCity is pretty easy to deploy – the Windows package has an installer which leaves you with a fully working server after just a few clicks and even the Linux package is pretty simple to deploy: Download, unzip, run runAll.sh and you’re done. To properly integrate it into a Linux server (so it will come back up after rebooting and can be reached via HTTP without having to run either Apache or TeamCity on a non-standard port), you’ll need to run your own Tomcat server.

This guide will tell you how to do it!

Read More
Logo of the XNA Game Game Architecture tutorial series, three interlocked gears

Game Architecture Day 2

Stylish logo of two engaged gears with the text XNA Game Architecture

Welcome to day 2 of the XNA Game Architecture series!

I have thought hard about whether I should just assume a certain level of object oriented programming knowledge in this series. People picking up these articles likely already have some knowledge about objects and design, so I settled on a quick run-over of the principles that hopefully won’t bore the seasoned developers and provide a good reference for people just starting out!

If you already know all this, feel free to skip ahead until it becomes interesting again or to the next chapter ;)!

Read More
Logo of the XNA Game Game Architecture tutorial series, three interlocked gears

Game Architecture Day 1

Stylish logo of two engaged gears with the text XNA Game Architecture

Welcome to day 1 of the XNA Game Architecture series! We’re about to create a small 3D Shoot ’em Up using the principles of modern software architecture.

If you missed the introduction, this series is about the architecture of games. Instead of focusing on a single concept, we’ll be focusing at how it all comes together and how you can keep your game’s code manageable and clean. You’ll be looking over my shoulder as I write a small game and explain why I do things one way and not the other :)

Today, I will start the project by creating a development tree that contains the actual XNA project and some third-party libraries I’m going to use within the game. Normally, I would add those libraries as I go, but I’ve got a pretty clear idea for this project and it will be easier for you because I can just package them all in a handy zip archive which you’ll find at the end of this article.

Read More

Game Architecture Series

Stylish logo of two engaged gears with the text XNA Game Architecture

Series

I’m planning to start a short article series:

There are a lot of XNA tutorials out there that explain the basics – how to display a sprite, how to do collision detection and how to render a bunch of colorful particles with additive blending. But there aren’t many articles that explain to you how you’re supposed to put it all together – how to structure a game so that it is easy to extend and remains manageable when the amount of code begins to grow.

The discipline that deals with this issue is called software architecture. Like programming, or any other creative process, it relies a lot on tacit knowledge – finding a good solution without first running down an alley of dead ends (that you can identify using the Principles of Object-Oriented Design) requires a lot of experience.

What I will do in this series is let you look over my shoulder as I design a small game and try to explain my motivations for choosing one design over another while I do so. This will give you a solid starting point and an understanding of the design process that you can apply to your own game projects.

The Meaning of 100% Test Coverage

When I release components, example code or even just helper classes, I often tout 100% test coverage as a feature. Which (as I probably also state often enough :P), means that my unit tests execute 100% of all lines in the source code. But what advantage does this actually bring to a developer, and, just as interesting, what does having complete test coverage not mean?

For people practicing true TDD (test first -> red, green, refactor), 100% coverage is nothing unusual, though even they may decide to not write tests for all invalid inputs possible: if a piece of code satisfies all the tests and the tests cover everything the code should do, it’s enough. If you’re building a library on the other side, the use case of a customer providing invalid inputs will be a valid concern worthy of a test.

I, however, am currently adding unit tests to an existing code base and I decided to go for 100% test coverage. In this short article, I will explain why I see complete test coverage as a worthwhile goal, what effect going for that level of test coverage has on a project and what it says about the code.

Read More