Welcome to day 1 of the XNA Game Architecture series! We’re about to create a small 3D Shoot ’em Up using the principles of modern software architecture.
If you missed the introduction, this series is about the architecture of games. Instead of focusing on a single concept, we’ll be focusing at how it all comes together and how you can keep your game’s code manageable and clean. You’ll be looking over my shoulder as I write a small game and explain why I do things one way and not the other :)
Today, I will start the project by creating a development tree that contains the actual XNA project and some third-party libraries I’m going to use within the game. Normally, I would add those libraries as I go, but I’ve got a pretty clear idea for this project and it will be easier for you because I can just package them all in a handy zip archive which you’ll find at the end of this article.
The Development Tree
My first step will be to create a new development tree. A development tree is the directory structure used to organize a game’s projects and their files.
Let me think of a good name for our new Shoot ’em Up. How about "Space Invaders"? Nah, I think someone else used that already. "R-Type" maybe? Googles… nope, looks like some small niche game used that name, too. "Tyrian?" Dang. How do they come up with these names?
I know! I’ll call my fictitious company "Crisp" and my game "Shmup". Now that’s just brilliant!
Note to the reader: if that sounds stupid, that’s so because I want to motivate you to find your own name for the game ;).
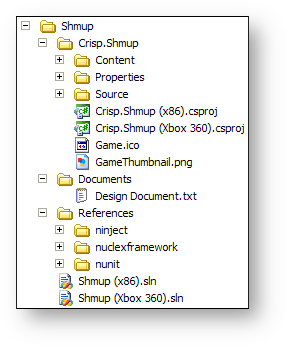
Back to the development tree! Obviously, the directory housing the development tree will be named Shmup after the game’s title. I like to keep things simple, so the contents of my development tree will look like this:

From top to bottom, this is what the directories are for:
-
 Crisp.Shmup – This is the actual XNA
game project. If a game has multiple projects (like perhaps a supporting
.dll or a map editor), they would sit in parallel to this directory. Projects
can be recognized by their naming which always follows the scheme
Crisp.Something (or Crisp.Something.Longer and so on)
-
 Documents – Here I place any
documents related to the game, with additional subdirectories as needed. This is
just an example and there could be other folders in parallel to this, eg.
 Sketches if I wanted to keep some concept drawings with the game.
-
 References – Contains all third-party
libraries used by my game. I’m always very careful about making sure that I
remember the exact versions of the libraries I put in this folder and any changes
I make to them. When I upgraded from XNA 3.0 to XNA 3.1, for example, all I had
to do to upgrade Ninject (we’ll talk about the specific libraries later)
was to download the sources again, reapply my changes to make it work in XNA
and then recompile it for XNA 3.1.
Storing referenced libraries in your development tree is a good idea: When another programmer joins your project or when you reinstall your system, all you have to do is copy the development tree over. Upgrading a library also becomes a matter of copying the new version into the References folder instead of replacing the reference in all projects.
-
 Shmup (x86).sln and
 Shmup (Xbox 360).sln – These are the Visual
Studio solutions for the game. I consider it important to make these easily
reachable, so I move them to the root folder of my development tree.
That’s my development tree. Programmers can immediately spot the solutions and
open them without browsing through the tree. Artists, musicians and so on will
quickly see the relevant directory their work goes into (as described for the
![]() Documents directory, these are created as needed – eventually,
there will be several more directories like
Documents directory, these are created as needed – eventually,
there will be several more directories like
![]() Sketches,
Sketches,
![]() Models and so on in the development tree.)
Models and so on in the development tree.)
Third-Party Libraries
In my early days as a programmer, I wanted to build everything myself because then I would know exactly how it works and I could be sure that its code was the smallest and fastest possible …and probably broken.
While today I may have the skill to build it and make it work, over time I have found that for any task where there is a popular library in existence, without exception, this library works well and efficiently. I also discovered that I’m not at all interested in studying the 40-page PNG specification or learning how to decode .ogg files just so I can load textures or play music in my game ;).
Here are the libraries I’m going to use in this game:
-

Obviously, I’m going to use Microsoft’s XNA Framework. This, too, is a third-party library. -

NUnit, a unit testing framework. It’s not often that I do a project without NUnit, simply because tests lead to better design and give me confidence in the code. -

Ninject, an Inversion of Control container. This may sound like some complicated esoteric programming tool, but it actually makes building your game much easier as you will find out in when I start using it! -

My Nuclex Framework, a library of useful building blocks for game programmers. I don’t want this article to be a pitcher for my framework, but I would end up pulling in components from here anyway because that’s what I built it for.
You don’t need to download them right now; I have prepared a zip archive with my development tree including all third-party libraries that you can find at the end of this article.
I’m generally very pedantic about organizing the libraries in the development tree’s
![]() References folder. This includes writing down
the version of the library the files come from so I can see when an update is
available (or what version of the source I have to download if I want to recompile
the old library version for a newer XNA release.)
References folder. This includes writing down
the version of the library the files come from so I can see when an update is
available (or what version of the source I have to download if I want to recompile
the old library version for a newer XNA release.)
Project Setup
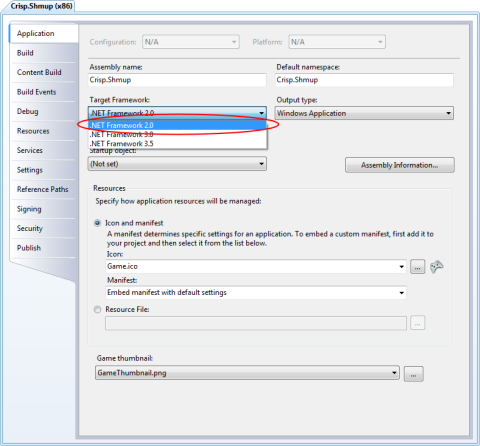
For the XNA game project, I will tweak a few settings One tweak is that I target .NET 2.0 instead of .NET 3.5. I do this because .NET 2.0 comes pre-installed with many more systems than .NET 3.5 and because .NET 2.0 is a much smaller download (22 MB versus 231 MB).

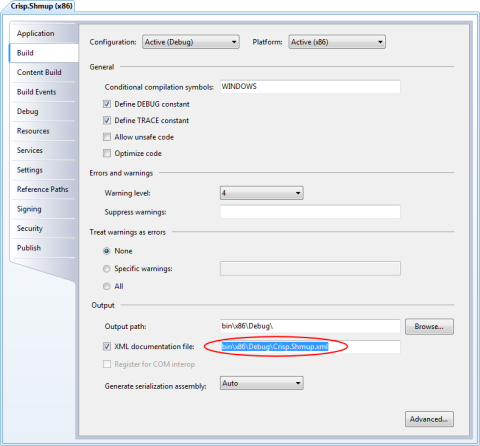
Next, I will enable the generation of XML documentation files, which will cause the compiler to issue warnings whenever I forget to write an XML comment over a public class or method.

I usually create two projects, one named
![]() Company.Something (x86).csproj which obviously is the x86 PC
build and one named
Company.Something (x86).csproj which obviously is the x86 PC
build and one named
![]() Company.Something (Xbox 360).csproj for the Xbox 360 build.
Logically, the x86 project will reference the normal binaries of any third party libraries
and the Xbox 360 project will reference their Xbox 360 binaries.
Company.Something (Xbox 360).csproj for the Xbox 360 build.
Logically, the x86 project will reference the normal binaries of any third party libraries
and the Xbox 360 project will reference their Xbox 360 binaries.
That concludes day 1 of the game architecture series. Remember that you’re just looking over my shoulder! Feel free to use your own directory structure and project settings if you’re following this series. I won’t refer to the directory structure much from here on, so don’t hold back.
In the next chapter, we will have a quick run-over of the fundamentals of software architecture before we finally start writing some code in chapter 3 ;)
Download
You can download the finished development tree from here:
[rokdownload menuitem=”14″ downloaditem=”36″ direct_download=”true”]Nuclex.Crisp.Shmup-Day1.7z[/rokdownload]
