If you want to download torrents on your Linux system, there are several clients to choose from. One of the nicest and fastest clients is rTorrent. It is full-featured, supports encryption, dynamic host table exchange and achieves fantastic download speeds.
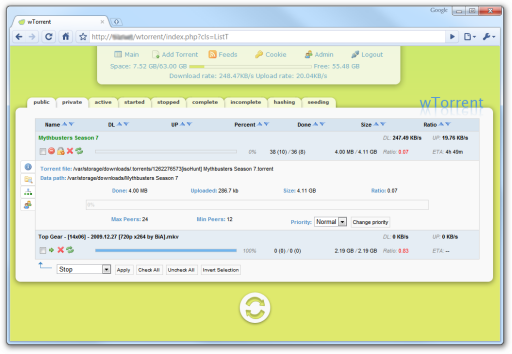
But its best feature probably is that it isn’t bound to any windowing toolkit. You can install one of its GUI frontends to manage it on your fancy KDE 4 desktop machine, but you can also run it on a headless system and manage torrent from a text-only console. And if you happen to run it on a home server like me, there’s wTorrent, a beaufitful AJAX-driven web frontend that allows you to manage your torrents in your browser.

Installing wTorrent isn’t the easiest thing to do, so, as when I tried to get the best out of my SSD, I decided to write this small article explaining how to do it. I’m using Gentoo Linux, but it shouldn’t be too hard to apply this article to another Linux distribution.
1. Set USE flags
Make sure you have the ‘xmlrpc‘ and ‘sqlite‘ USE flags set in your make.conf:
# [...]

# Enable XML-RPC. Amongst others, this affects rTorrent.
# Necessary because wTorrent uses XML-RPC to communicate with rTorrent.
USE="${USE} xmlrpc"

# Enable SQLite. Amongst others, this affects PHP.
# wTorrent uses an SQLite database to store additional data about torrents.
USE="${USE} sqlite"
Remember that if you have changed any use flags in your make.conf in this step, you’ll need to emerge --deep --update --newuse world to bring any packages affected by your changes back in sync.
2. Configure PHP
I’m assuming you have a working Apache installation with PHP enabled. PHP needs to be compiled with the ‘sqlite‘ and ‘pdo‘ USE flags enabled. The ‘sqlite‘ USE flag is global and should be set in your /etc/make.conf while ‘pdo‘ is a PHP-specific flag that can be set in /etc/portage/package.use like this:
###############################################################################
# php
#
#   pdo  Transactional database wrapper
#
dev-lang/php pdo
If you changed any flags, remember to get your system back in sync with its new USE flags by running emerge --deep --update --newuse world.
3. Install rTorrent
If rTorrent is run normally, it will terminate when the SSH shell exits. Luckily, Linux provides applications like dtach and screen which allow you to run a console application in a virtual screen from which you can detach your current console and re-attach to in a different session.
Gentoo users can set up rTorrent to run as a daemon simply by adding the package-specific ‘daemon‘ USE flag. This is best done in /etc/portage/package.use, eg.
###############################################################################
# rtorrent
#
#   daemon  Uses screen (similar to dtach) to daemonize rtorrent
#
net-p2p/rtorrent daemon
Then proceed to install rTorrent as usual, eg.
emerge rtorrent
After this, you can start rTorrent as a daemon using /etc/init.d/rtorrentd start and stop it again using /etc/init.d/rtorrentd stop. You can also add rTorrent to your system init script like any other daemon using rc-update add rtorrentd default.
4. Create User Account
You don’t want to run rTorrent as root, of course. I haven’t heard of a BitTorrent
client as an attack vector yet, but handing root rights on a golden plate to anyone
discovering such an exploit doesn’t sound like a good idea anyway
 . To change the user as whom rTorrent runs, edit /etc/conf.d/rtorrentd.
I recommend creating a special group and user account for rTorrent. If you’re using
Samba
to allow Windows clients to pick their completed downloads from a network share, you
might want to set up a group that’s shared between Samba and rTorrent:
groupadd --system storage
The --system parameter turns this into a system group (a group not intended for normal users logging into the system.)
Next comes the user account for rTorrent:
useradd \
  --home-dir /home/torrent \
  --gid storage \
  --create-home \
  --system \
  --comment "Special user account for rTorrent" \
  torrent
As before, --system turns this into a system account, which means that its password will not expire and that it will not appear in lists if you use a graphical login, for example. We don’t give it a password or login shell because it’s not intended for normal users to login as.
To set the user the daemonized rTorrent process will run as, edit /etc/conf.d/rtorrentd:
################################################################################
# USER
#
#   The user account that will be running rtorrent if launched
#   via /etc/init.d/rtorrentd
#

# This would make rtorrent run under the user who executed
# /etc/init.d/rtorrentd
#USER="$USER"

# This runs rtorrent as the user 'torrent'
USER="torrent"
5. Create .rtorrent.rc
rTorrent reads its configuration from a file called .rtorrent.rc in the directory of the user rTorrent is running as. Because we’re using rTorrent as a daemon, we’ll adapt rTorrent to read its configuration from a file in /etc instead.
If you don’t have an rtorrent.rc yet, start by downloading the example configuration file from rTorrent’s website:
wget \
  http://libtorrent.rakshasa.no/export/1121/trunk/rtorrent/doc/rtorrent.rc \
  --output-document=/etc/rtorrent.rc
Then, create a symlink to the file from where rTorrent looks for it:
ln -s /etc/rtorrent.rc /home/torrent/.rtorrent.rc
You can configure your rtorrent.rc to your liking, the only requirement being that you enable the SCGI xmlrpc interface as shown below. You can find some advice on optimizing your BitTorrent settings here: Optimize your BitTorrent Download Speed and here: rTorrent Performance Tuning.
# [...]

# SCGI for WTorrent connection (Apache)
scgi_port = localhost:5000

# SCGI for WTorrent connection (lighthttpd)
#scgi_local = /tmp/rtorrent.socket
6. Install mod_scgi
To allow wTorrent to connect to rTorrent, you need mod_scgi for Apache. Emerge it with:
emerge mod_scgi
Then enable it in /etc/conf.d/apache2 by adding the following line after the other APACHE2_OPTS have been defined:
# Enable SCGI module to allow wTorrent to control rTorrent remotely
APACHE2_OPTS="${APACHE2_OPTS} -D SCGI"
As far as I understand it, mod_scgi connects to an SCGI socket and exposes it in Apache as an XML-RPC service. wTorrent connects to this XML-RPC service (from the server side, so you can restrict this service to the loopback adapter) to remote-control rTorrent.
To establish this XML-RPC socket, add the following to your /etc/apache2/vhosts.d/default_vhost.include file:
# Mount localhost:5000 (rTorrent) as an XML-RPC service at /RPC2
SCGIMount /RPC2/ localhost:5000

# Allow access to /RPC2 for authenticated local clients
<Location /RPC2>

        AuthName "Private"
        AuthType Basic
        AuthBasicProvider file
        AuthUserFile /var/www/localhost/wtorrent.htpasswd
        Require user torrent

        Order allow,deny
        Allow from 127.0.0.1

</Location>
I used HTTP basic authentication as an additional security layer. Otherwise, any XML-RPC client running locally on the server would be able to control rTorrent without prior password authentication. To generate the .htpasswd file, do the usual:
htpasswd -c /var/www/localhost/wtorrent.htpasswd torrent
After this step (and after restarting Apache to apply the configuration changes, of course,) rTorrent can be queried via XML-RPC locally!
7. Install wTorrent
I’ve used the current development trunk of wTorrent (Revision 100) for my test. However, there are some issues with its version of the XML-RPC PHP library: As ticket 373 in the rTorrent TRAC setup explains, rTorrent returns 64-bit integers which aren’t understood by the XML-RPC PHP library.
I’ve modified my wTorrent sources slightly:
- wTorrent’s XML-RPC library now accepts 64-bit integers (as long as they aren’t larger than a 32-bit integer, I suppose – unless php’s integers also become 64-bits wide on my x64 system.)
- The installer outputs clearer error messages when something goes wrong in the SCGI part
- I can specify an absolute path for the torrent download directory
You can download my patched build from here (also includes a separate patch file
detailing what I changed.)
[rokdownload menuitem=”17″ downloaditem=”37″ direct_download=”true”]wTorrent trunk (r100) with patch[/rokdownload]
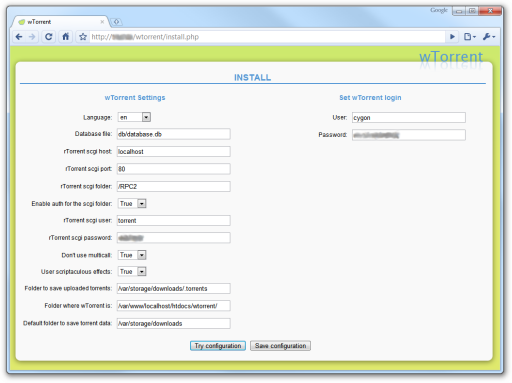
The rest is simple: fire up the wTorrent installer, enter your configuration (make sure the webserver can write to the Folder to save uploaded torrents and that rTorrent can write to the Default folder to save torrent data and everything should now work.

Use /RPC2 as the rTorrent SCGI folder, set rTorrent SCGI host to localhost and use an rTorrent SCGI port of 80 (as it’s now connecting to Apache’s XML-RPC bridge to SCGI provided by mod_scgi.)