For the C++ game programmer, there’s a huge collection of Open Source and commercial libraries available doing all kinds of things from simulating physics, reading common image formats or storing your data to rendering cutting-edge 3D graphics. But consuming those libraries in you own applications is often accompanied with a bit of hazzle since you need to point your linker to the right import libraries, copy the right DLLs into your project’s output directory and add the directory containing the matching headers to your compiler’s "include" directories.
It will get a little harder even when you target the Windows 8 App Store, where you need to provide binaries compiled for 3 platforms: x86, x64 and arm. I’ve been using C++ for over 10 years now and over time, I have come up with a method for organizing and consuming libraries that has served me very well.
Here’s what I do:
Directory Layout
My solutions nearly always consist of multiple projects, so I use a directory layout that places the solution file one level above the projects.
-
 AwesomeApplication
-
 AwesomeExecutable
-
 Source
-
 AwesomeExecutable.vcxproj
-
-
 UtilityLibrary
-
 Source
-
 UtilityLibrary.vcxproj
-
-
 References
-
 freeimage
-
 include
-
 msvc-10.0-x86
-
 msvc-10.0-x64
-
-
-
 AwesomeApplication.sln
-
All third-party libraries are stored in the ![]() References directory which sits in parallel to the project
directories (and never inside a project). There are 3 very good reasons for this:
References directory which sits in parallel to the project
directories (and never inside a project). There are 3 very good reasons for this:
- You can copy the project around. With the third-party libraries being part of your development tree (and not installed in some obscure location on your system only), it’s no problem to invite others to join you and if you need to fix a bug several months later, it’ll still compile without requiring you to track down the exact library versions you had installed today.
- All projects in the solution will reference the same version of the libraries. Just think of the mess when one product would require several versions of a single library side-by-side. This layout prevents that from happening right from the beginning.
- You can easily upgrade third-party libraries. Just place the new version in the References directory and all projects will be compiled with the new version.
Include Directories
Let’s assume I wanted to use FreeImage, an Open Source library for loading and saving different image file formats, in my project. I’ve just added the FreeImage directory to my development tree like shown in the directory layout above:
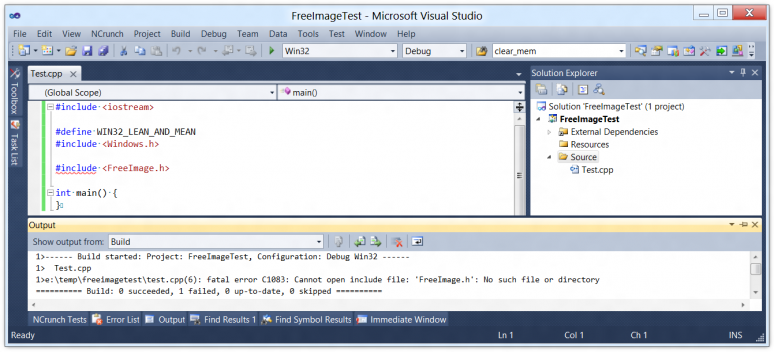
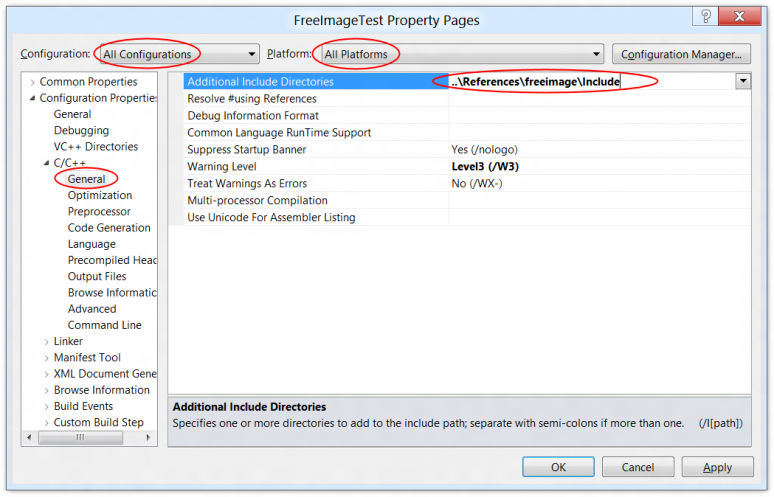
Visual C++ doesn’t know where to find FreeImage.h, so I’ll add the include directory for FreeImage to the "Additional Include Directories" list in the project settings, using a relative path (paths are always relative to the location of the .vcxproj file):
Always make sure you selected "All Configurations" and "All Platforms" when doing this so you don’t have to repeat the steps 6 times over for Debug and Release under Win32, x64 and possibly Arm :)
Libraries
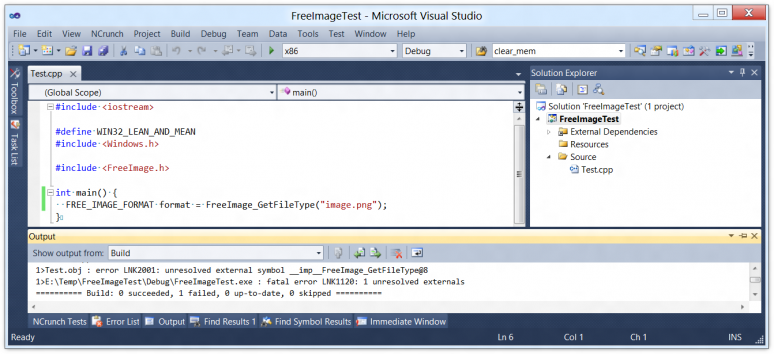
Now Visual C++ will be able to find FreeImage.h but the linker will be giving me trouble because he doesn’t know where to find all the classes and methods declared by this header:
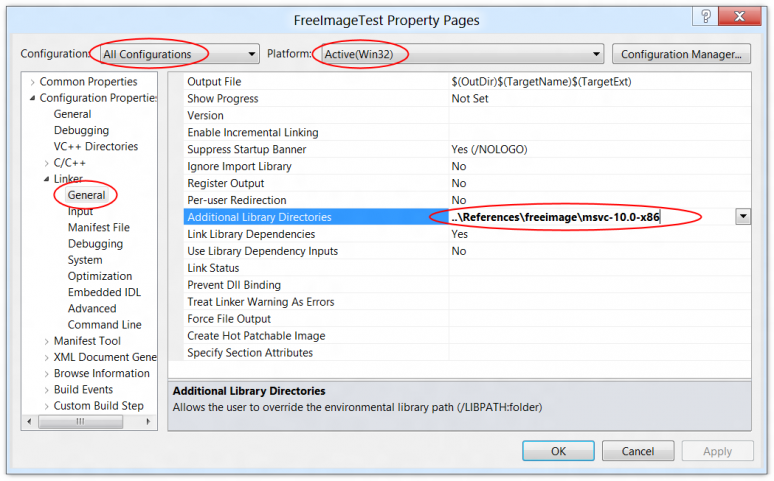
To add the libraries, I first add the directory where the FreeImage libraries are stored in to the "Additional Library Directories". My directory layout uses different directories for different platforms, so this is the same between Debug and Release builds (meaning you should pick "All Configurations") in the upper left, but adjust the directory for each platform:
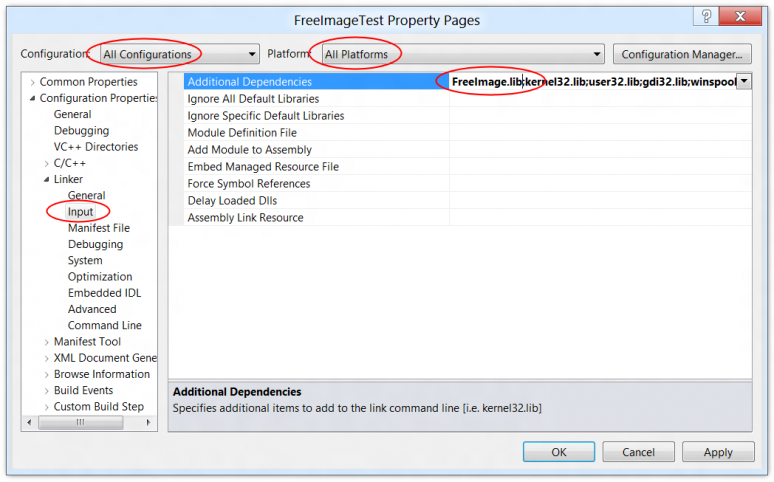
Now that the linker knows where to find the FreeImage libraries, I can add the actual import library (a library that accompanies DLLs and contains a list of the exposed classes and methods). This should be done for "All Configurations" and "All Platforms" again so you don’t have to repeat it for all combinations or "Configurations" and "Platforms".
Binaries
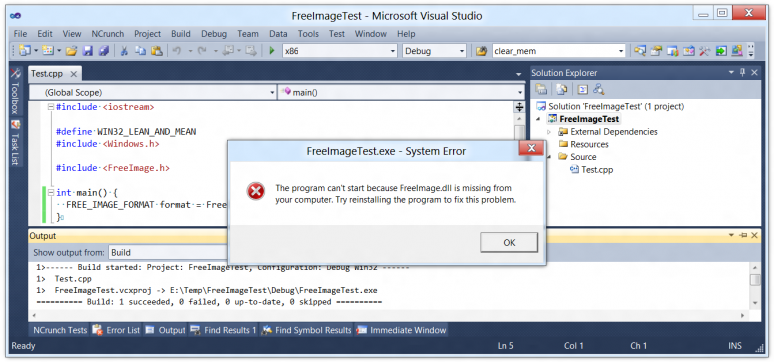
Now that the project compiles, surely it will work, right? Nope – the .exe created by Visual C++ now knows that it needs to load FreeImage.dll, but that DLL will not be copied into the project’s output directory automatically:
This is typically solved by adding custom build steps to a project, but here’s a little trick to better maintain your scripted build steps:
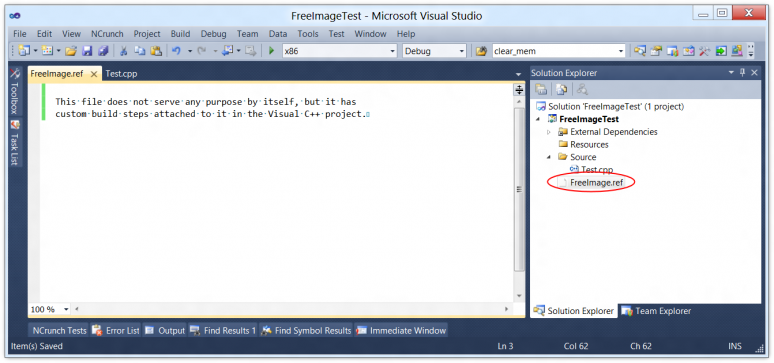
First, add a new text file to the project. Name it FreeImage.ref. Its contents and name are of no relevance (though I usually have it contain a message explaining the purpose of the file):
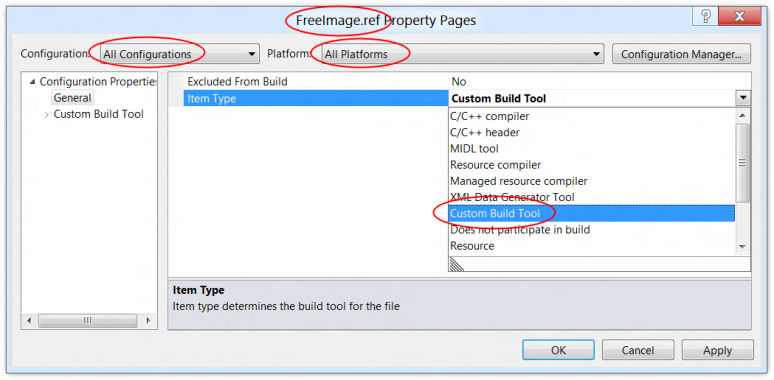
Then go to the file’s properties (right click on FreeImage.ref, not the project, select "Properties") and configure it to use the "Custom Build Tool":
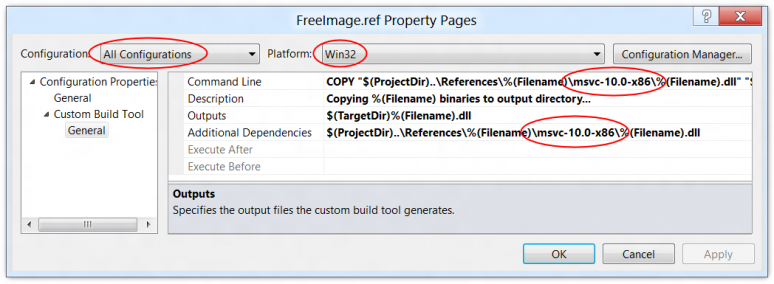
Then configure the custom build step to copy the DLL into the project’s output directory:
This is another place where the configuration is different for each platform, you need to replace the msvc-10.0-x86 with the compiler and processor architecture used in each platform you configured in Visual C++. Here are the contents of the individual fields:
| Command Line | COPY "$(ProjectDir)..\References\%(Filename)\msvc-10.0-x86\%(Filename).dll" "$(TargetDir)" > NUL |
| Description | Copying %(Filename) binaries to output directory... |
| Outputs | $(TargetDir)%(Filename).dll |
| Additional Dependencies | $(ProjectDir)..\References\%(Filename)\msvc-10.0-x86\%(Filename).dll |
This will pick a binary with the same name as the .ref file from the References directory. The cool thing about this is that if you have more binaries, you can just copy the very same instructions into another .ref file and it will work. You can also exclude the .ref file from your build if you don’t want the binary to be copied into your output directory.
By filling out the optional "Additional Dependencies" field, I can help Visual C++ determine whether the file in the build target directory is already up-to-date, so that it will only be copied for the first build or when I update the binaries in my References directory.
Finished!
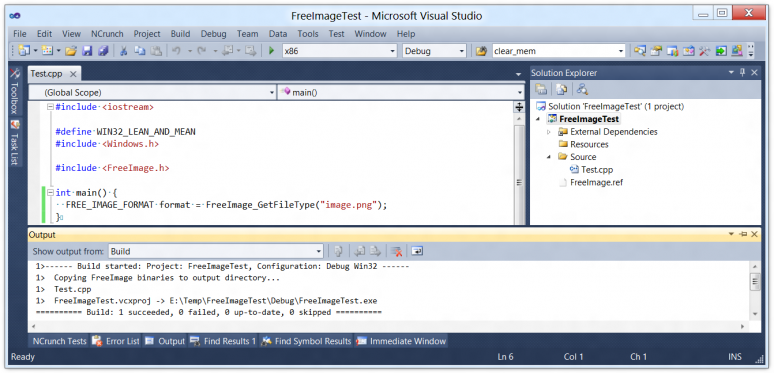
Now I can Build, Rebuild and Clean my project at any time and it will just work! If I wanted to remove FreeImage again, I wouldn’t have to pick apart a long, project-wide list of custom build steps – instead, I could simply delete FreeImage.ref from my project. I can also easily see which libraries are consumed by the project in my IDE:
Have fun! :)
