Being able to rely on your memory is one of the most important aspects of having a stable PC. Thus, paying extra for premium memory seemed like a wise choice to me.
Yet I have been surprisingly unlucky with my memory.
In this post I’ll show how to identify broken memory cells and how to prevent Windows and Linux from accessing them, resulting in a stable system while discarding only a few Kilobytes of memory.
My first purchase back in 2005 was a matched pair of Corsair XMS DIMMs which somehow rather quickly started causing problems. I should probably have sent them in but I didn’t want the downtime that entailed. Up next were OCZ’s ReaperX EB modules. They were excellent until after a motherboard change, when my system began crashing a lot. When I went for my next upgrade, G.Skill was the top brand, so my current set are 4 matched DIMMs of G.Skill’s F3-10666CL7-4GB (that’s CL7 latency, try even finding them for sale!) For 6-8 months everything was fine, but then the crashes returned.
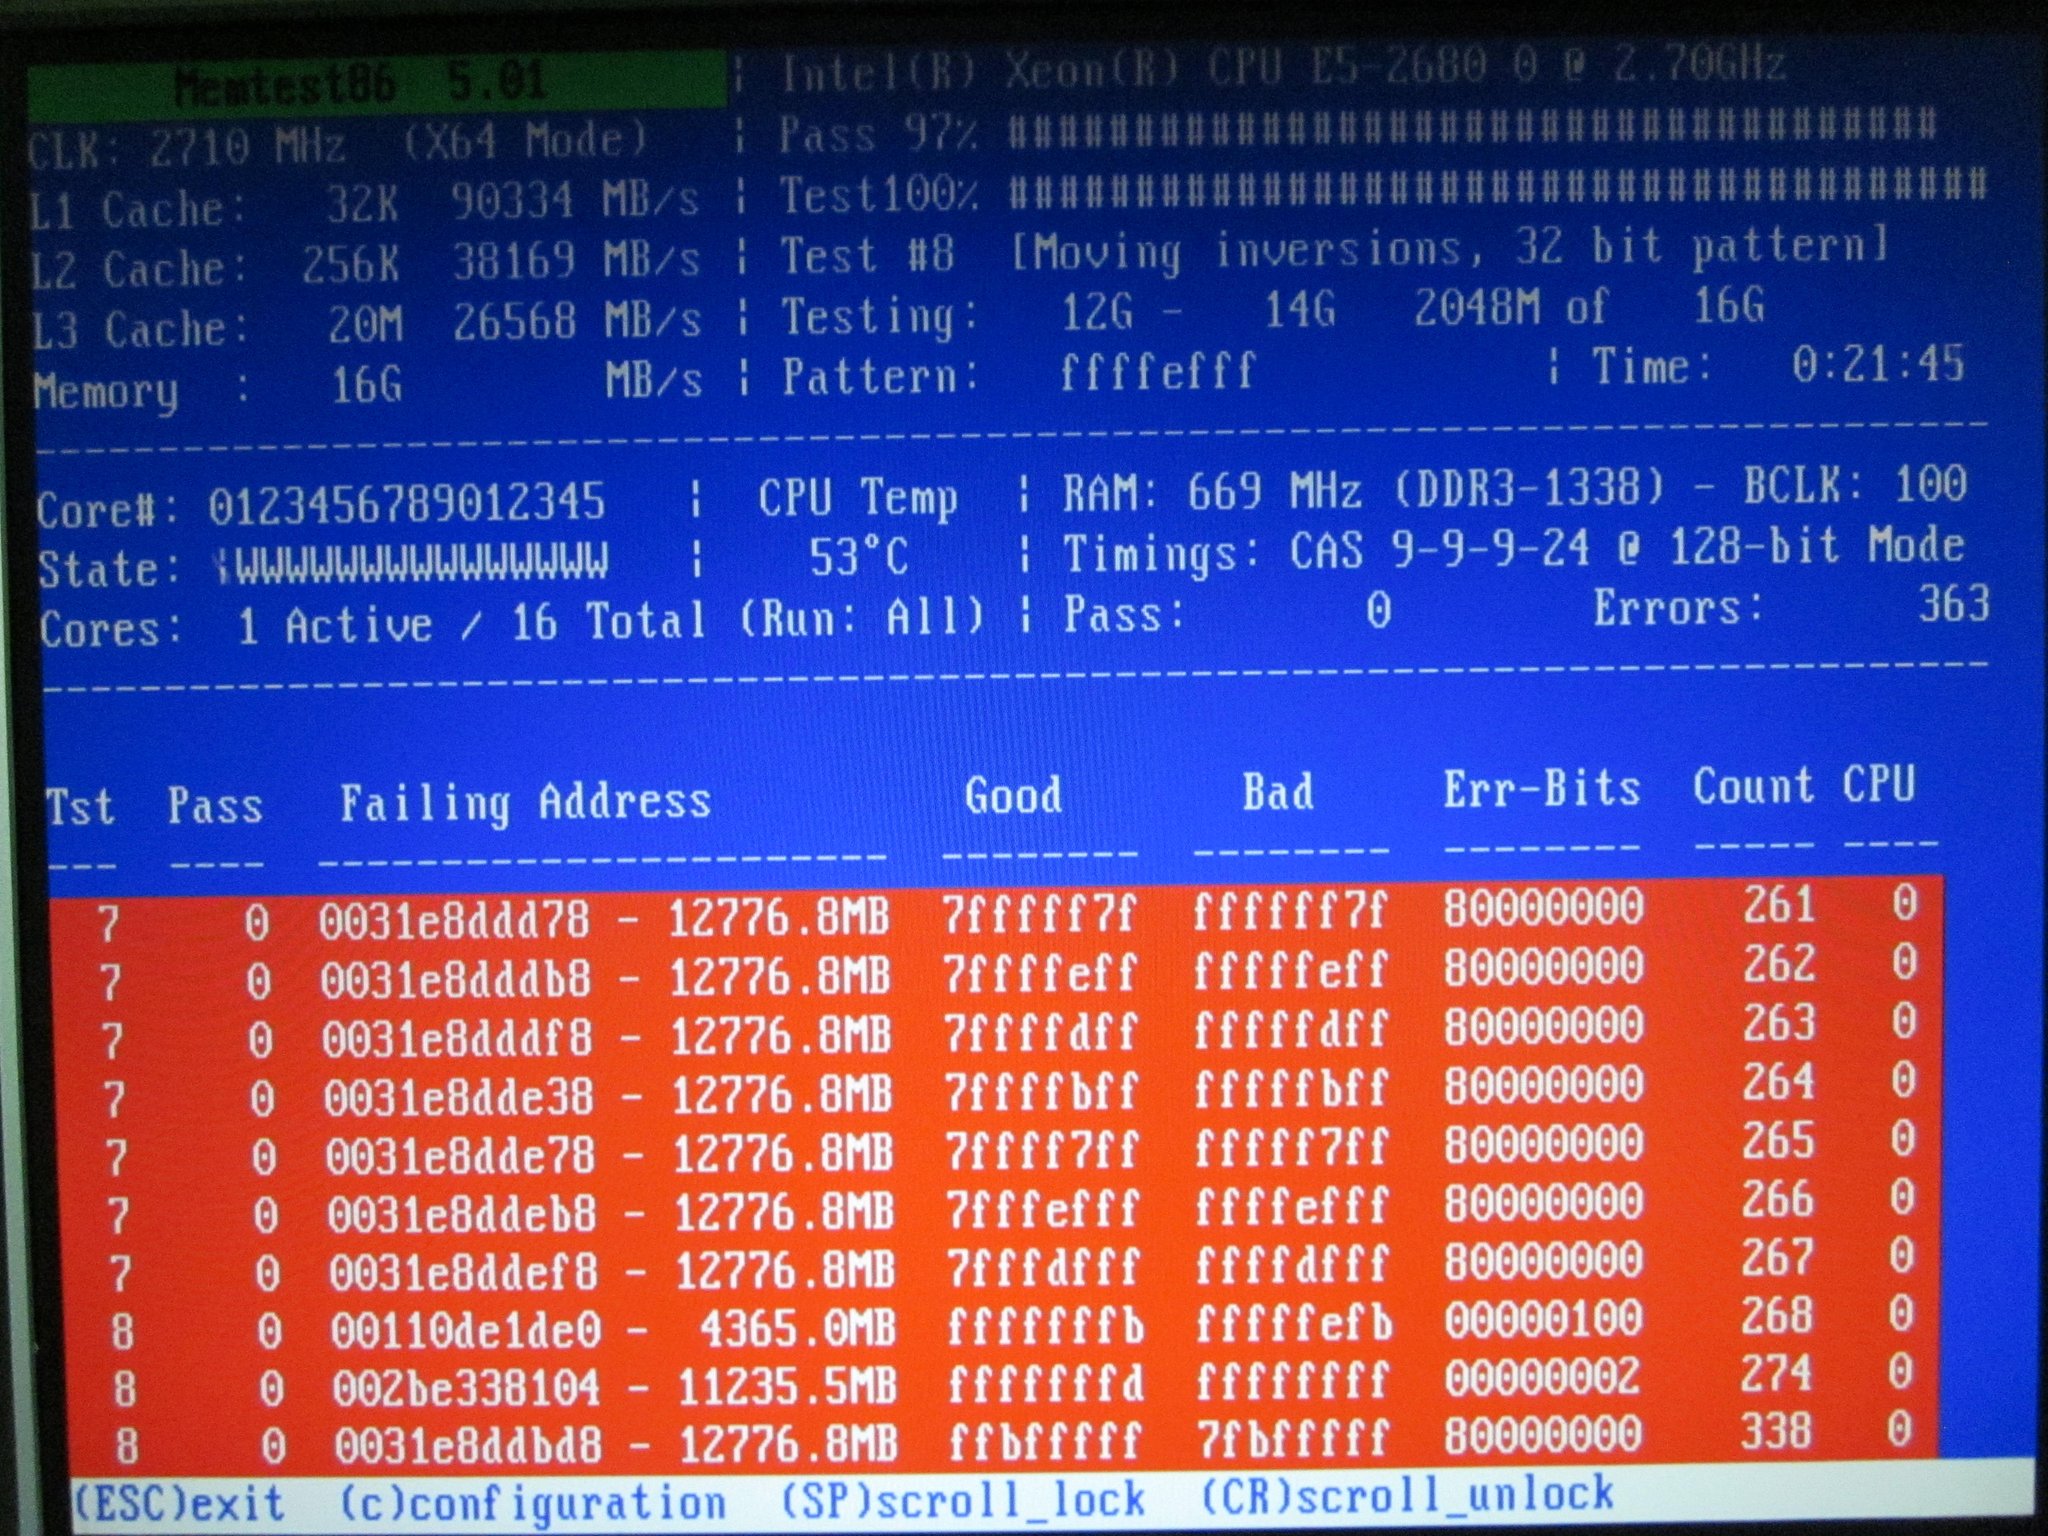
All the time, I didn’t even want to consider that memory might be to blame for the (Windows) crashes, especially since my system was rock solid on Linux. Until I finally gave in and ran Memtest86+.

Thaat’s not looking good…
Wiping and Reseating
The first thing I tried out of desperation was simply to remove all modules from my motherboard, wipe their contact plates with an anti-static cloth and reinsert them firmly. Believe it or not, this actually reduced the amount of errors.
Overvolting
I tried to increase the voltage from 1.5V to 1.55V and then to 1.6V, but this seemed to have no effect at all.
Increased voltage would probably help if the problems were due to timing issues, but in my case, a few memory cells seem well and truly broken.
Finding Broken Cells
All errors that remained were of the type you see in the screenshot, individual broken memory cells that reliably produced bit errors.
So wouldn’t it be nice if I could just tell my OS to consider the broken memory areas as taken and never access them?
The first step is, of course, to run memtest86+ and write down all failing memory addresses. It doesn’t make sense to go for a finer granularity than 4 kilobytes, so from the screenshot above, I simply wrote down 0x0031e8ddbd8 up to 0x0031e8ddef8 as defective. 0x002be338104, too, of course.
Let’s round that to full 4 kilobyte steps (so the last 3 digits become 0) while still covering the affected memory cells and you get:
  0x0031e8dd000 +4K (ending at 0x0031e8de000)
  0x002be338000 +4K (ending at 0x002be339000)
Now we only need to tell the OS to not ever access those two 4 kilobyte blocks.
Marking Bad RAM in Linux
In 2006, the way to go was the "badmem" patch. It was never accepted into the mainstream kernel, however, and is outdated now.
Luckily, the Linux Kernel Command-Line Parameter documentation states that there’s now a parameter called "memmap" that can be used to mark arbitrary memory regions as "reserved".
Edit your GRUB or LILO configuration to tell your kernel which memory regions to treat as "reserved" like this: (in this case, I use LILO – note the append property)
boot=/dev/sda
prompt
timeout=50
default=Linux.Gentoo

image=/boot/vmlinuz-4.9.16-gentoo
  label=Linux.Gentoo
  read-only
  root=/dev/sda4
  append="memmap=8K\$0x110de1000 memmap=4K\$0x2be338000 memmap=8K\$0x31e8dd000"

other=/dev/sda1
  label=Windows.10

image=/boot/memtest86plus/memtest
  label=memtest86+
When you boot your kernel with these arguments, your dmesg should list the memory regions you specified as reserved:
[    0.000000] e820: user-defined physical RAM map:
[    0.000000] user: [mem 0x0000000000000000-0x000000000009e7ff] usable
[    0.000000] user: [mem 0x000000000009e800-0x000000000009ffff] reserved
[    0.000000] user: [mem 0x00000000000e0000-0x00000000000fffff] reserved
[    0.000000] user: [mem 0x0000000000100000-0x000000003c88dfff] usable
[    0.000000] user: [mem 0x000000003c88e000-0x000000003c8bafff] reserved
[    0.000000] user: [mem 0x000000003c8bb000-0x000000003c9d0fff] ACPI data
[    0.000000] user: [mem 0x000000003c9d1000-0x000000003d5e3fff] ACPI NVS
[    0.000000] user: [mem 0x000000003d5e4000-0x000000003eb06fff] reserved
[    0.000000] user: [mem 0x000000003eb07000-0x000000003eb29fff] usable
[    0.000000] user: [mem 0x000000003eb2a000-0x000000003eb2bfff] reserved
[    0.000000] user: [mem 0x000000003eb2c000-0x000000003eb2cfff] usable
[    0.000000] user: [mem 0x000000003eb2d000-0x000000003ebb2fff] ACPI NVS
[    0.000000] user: [mem 0x000000003ebb3000-0x000000003effffff] usable
[    0.000000] user: [mem 0x0000000040000000-0x000000004fffffff] reserved
[    0.000000] user: [mem 0x00000000fed1c000-0x00000000fed1ffff] reserved
[    0.000000] user: [mem 0x00000000ff000000-0x00000000ffffffff] reserved
[    0.000000] user: [mem 0x0000000100000000-0x0000000110de0fff] usable
[    0.000000] user: [mem 0x0000000110de1000-0x0000000110de2fff] reserved
[    0.000000] user: [mem 0x0000000110de3000-0x00000002be337fff] usable
[    0.000000] user: [mem 0x00000002be338000-0x00000002be338fff] reserved
[    0.000000] user: [mem 0x00000002be339000-0x000000031e8dcfff] usable
[    0.000000] user: [mem 0x000000031e8dd000-0x000000031e8defff] reserved
[    0.000000] user: [mem 0x000000031e8df000-0x00000004bfffffff] usable
Success! Linux will no longer touch the broken memory cells.
Marking Bad RAM in Windows
On Windows, at first it didn’t seem possible to mark memory as reserved or broken, but eventually, I came across a post describing how Windows, when running on ECC RAM, automatically enters bad RAM cells into its BCD (Boot Configuration Ddata) store.
Turns out you can manually add memory to this list, too.
Open up a command prompt with administrator privileges, then type:
bcdedit /set {badmemory} badmemorylist 0x110de1 0x110de2 0x2be338 0x31e8dd 0x31e8de
Obviously, replace the memory addresses with the ones defective in your memory. Remove the last 3 digits since this is the physical "page number" (CPUs map and deal with memory in pages of 4 kilobytes).
Check that the bad memory list has indeed been updated by typing:
bcdedit /enum {badmemory}

Finally, make sure Windows does avoid the memory blocks marked as bad:
bcdedit /set badmemoryaccess no
Reboot and Windows will no longer touch your broken memory areas.
Results
Using the above two tweaks, I have gone from hourly crashes in Windows 10 to none. And from no crashes in Linux to still no crashes in Linux (but some peace of mind that I’m not silently corrupting data in memory).