How to Consume DLLs in Visual C++

For the C++ game programmer, there’s a huge collection of Open Source and commercial libraries available doing all kinds of things from simulating physics, reading common image formats or storing your data to rendering cutting-edge 3D graphics. But consuming those libraries in you own applications is often accompanied with a bit of hazzle since you need to point your linker to the right import libraries, copy the right DLLs into your project’s output directory and add the directory containing the matching headers to your compiler’s "include" directories.

It will get a little harder even when you target the Windows 8 App Store, where you need to provide binaries compiled for 3 platforms: x86, x64 and arm. I’ve been using C++ for over 10 years now and over time, I have come up with a method for organizing and consuming libraries that has served me very well.

Here’s what I do:

Directory Layout

My solutions nearly always consist of multiple projects, so I use a directory layout that places the solution file one level above the projects.

  • Directory Icon AwesomeApplication
    • Directory Icon AwesomeExecutable
      • Directory Icon Source
      • Visual C++ Project Icon AwesomeExecutable.vcxproj
    • Directory Icon UtilityLibrary
      • Directory Icon Source
      • Visual C++ Project Icon UtilityLibrary.vcxproj
    • Directory Icon References
      • Directory Icon freeimage
        • Directory Icon include
        • Directory Icon msvc-10.0-x86
        • Directory Icon msvc-10.0-x64
    • Visual Studio Solution Icon AwesomeApplication.sln

All third-party libraries are stored in the Directory Icon References directory which sits in parallel to the project directories (and never inside a project). There are 3 very good reasons for this:

  1. You can copy the project around. With the third-party libraries being part of your development tree (and not installed in some obscure location on your system only), it’s no problem to invite others to join you and if you need to fix a bug several months later, it’ll still compile without requiring you to track down the exact library versions you had installed today.
  2. All projects in the solution will reference the same version of the libraries. Just think of the mess when one product would require several versions of a single library side-by-side. This layout prevents that from happening right from the beginning.
  3. You can easily upgrade third-party libraries. Just place the new version in the References directory and all projects will be compiled with the new version.

Include Directories

Let’s assume I wanted to use FreeImage, an Open Source library for loading and saving different image file formats, in my project. I’ve just added the FreeImage directory to my development tree like shown in the directory layout above:

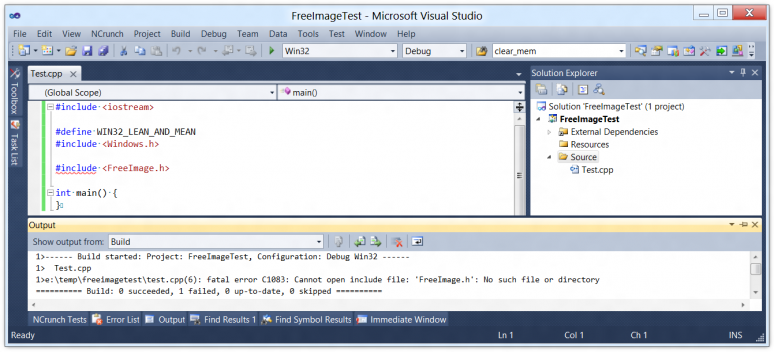
Screenshot of Visual C++ complaining about a missing header

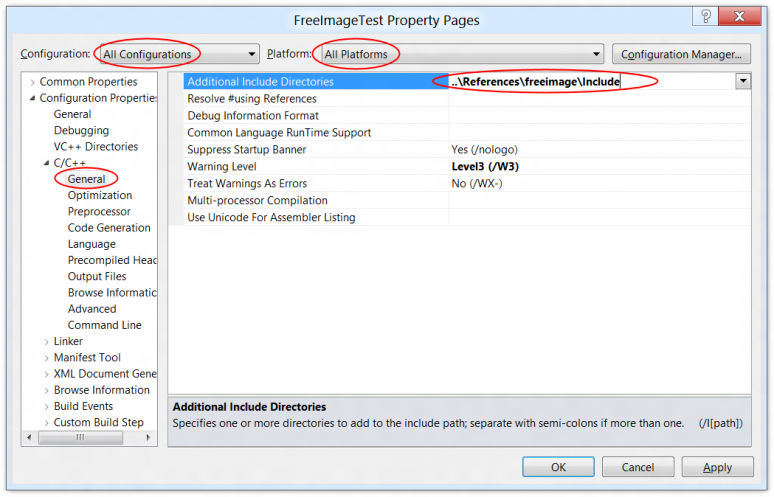
Visual C++ doesn’t know where to find FreeImage.h, so I’ll add the include directory for FreeImage to the "Additional Include Directories" list in the project settings, using a relative path (paths are always relative to the location of the .vcxproj file):

Screenshot of the additional include directories in the project settings of Visual C++

Always make sure you selected "All Configurations" and "All Platforms" when doing this so you don’t have to repeat the steps 6 times over for Debug and Release under Win32, x64 and possibly Arm :)

Libraries

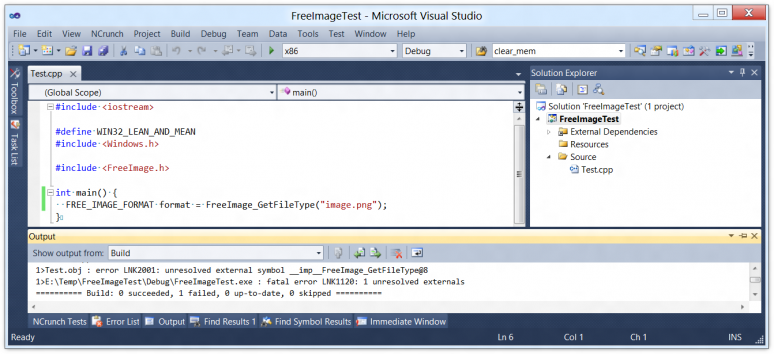
Now Visual C++ will be able to find FreeImage.h but the linker will be giving me trouble because he doesn’t know where to find all the classes and methods declared by this header:

Screenshot of Visual C++ complaining about unresolved external symbols

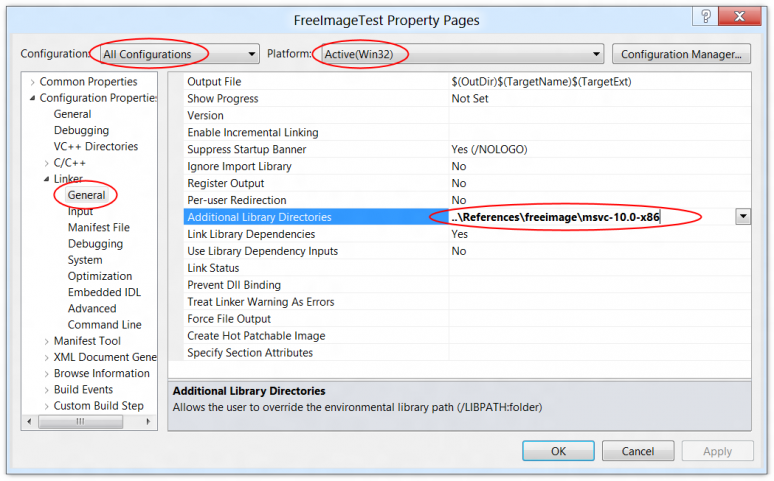
To add the libraries, I first add the directory where the FreeImage libraries are stored in to the "Additional Library Directories". My directory layout uses different directories for different platforms, so this is the same between Debug and Release builds (meaning you should pick "All Configurations") in the upper left, but adjust the directory for each platform:

Screenshot of the library directories in the Visual C++ project settings

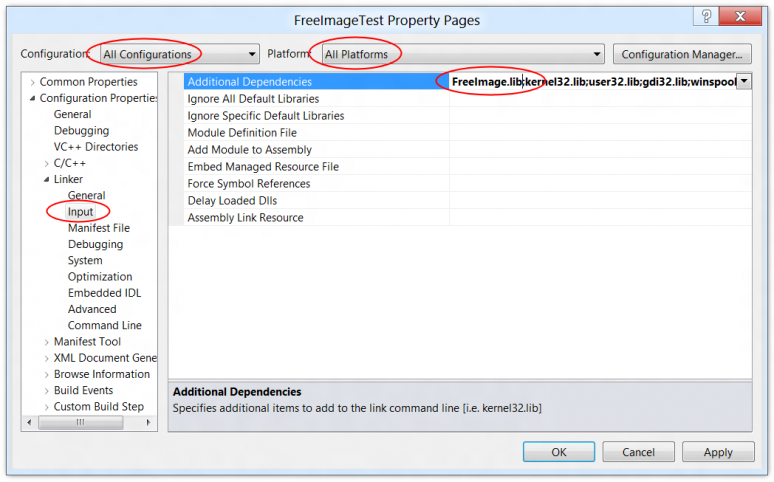
Now that the linker knows where to find the FreeImage libraries, I can add the actual import library (a library that accompanies DLLs and contains a list of the exposed classes and methods). This should be done for "All Configurations" and "All Platforms" again so you don’t have to repeat it for all combinations or "Configurations" and "Platforms".

Screenshot of the additional dependencies in the Visual C++ project settings

Binaries

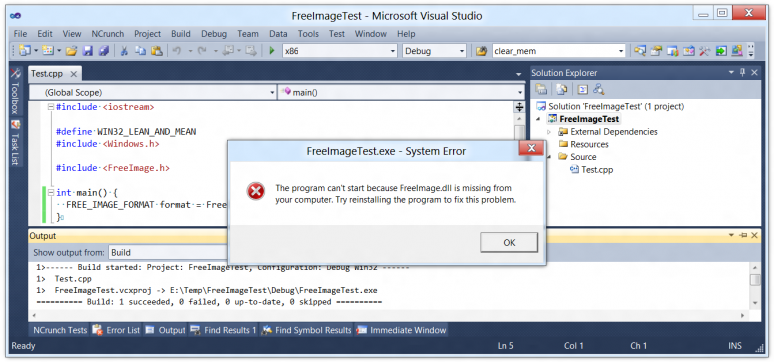
Now that the project compiles, surely it will work, right? Nope – the .exe created by Visual C++ now knows that it needs to load FreeImage.dll, but that DLL will not be copied into the project’s output directory automatically:

Screenshot of Visual C++ with Windows complaining about a missing DLL

This is typically solved by adding custom build steps to a project, but here’s a little trick to better maintain your scripted build steps:

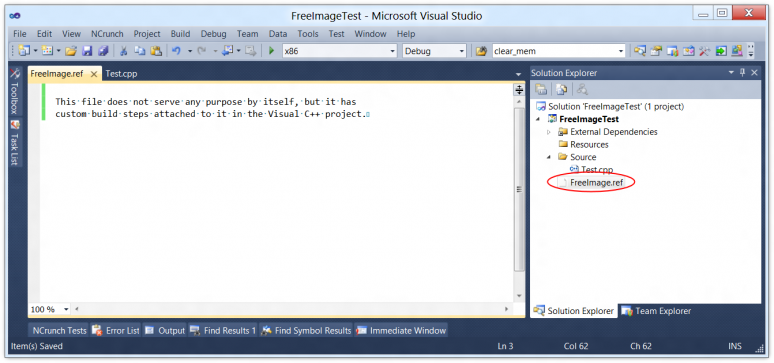
First, add a new text file to the project. Name it FreeImage.ref. Its contents and name are of no relevance (though I usually have it contain a message explaining the purpose of the file):

Screenshot of Visual C++ with a Ref file for FreeImage added to the project

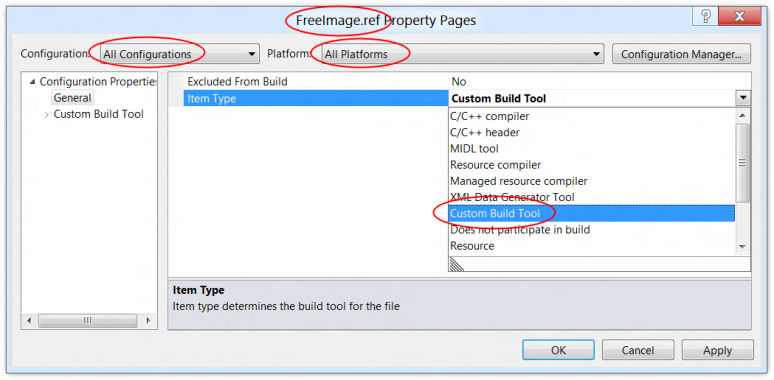
Then go to the file’s properties (right click on FreeImage.ref, not the project, select "Properties") and configure it to use the "Custom Build Tool":

Screenshot showing how to add custom build steps to a file in Visual C++

Then configure the custom build step to copy the DLL into the project’s output directory:

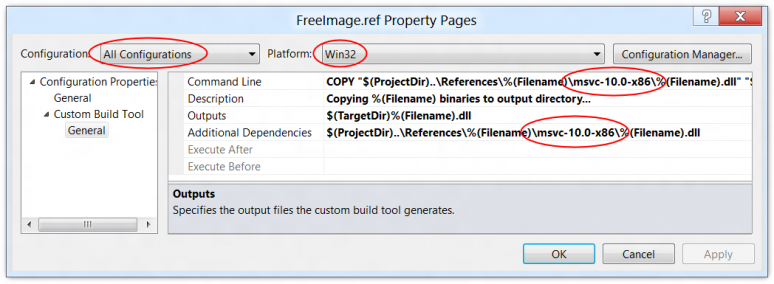
Screenshot showing how to configure custom build steps for a binary in Visual C++

This is another place where the configuration is different for each platform, you need to replace the msvc-10.0-x86 with the compiler and processor architecture used in each platform you configured in Visual C++. Here are the contents of the individual fields:

Command Line COPY "$(ProjectDir)..\References\%(Filename)\msvc-10.0-x86\%(Filename).dll" "$(TargetDir)" > NUL
Description Copying %(Filename) binaries to output directory...
Outputs $(TargetDir)%(Filename).dll
Additional Dependencies $(ProjectDir)..\References\%(Filename)\msvc-10.0-x86\%(Filename).dll

This will pick a binary with the same name as the .ref file from the References directory. The cool thing about this is that if you have more binaries, you can just copy the very same instructions into another .ref file and it will work. You can also exclude the .ref file from your build if you don’t want the binary to be copied into your output directory.

By filling out the optional "Additional Dependencies" field, I can help Visual C++ determine whether the file in the build target directory is already up-to-date, so that it will only be copied for the first build or when I update the binaries in my References directory.

Finished!

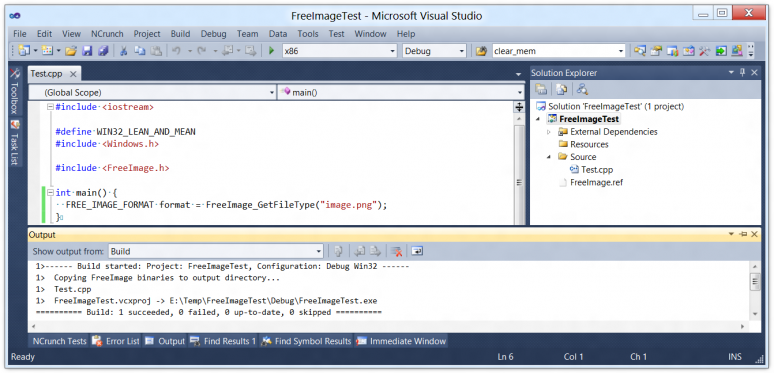
Now I can Build, Rebuild and Clean my project at any time and it will just work! If I wanted to remove FreeImage again, I wouldn’t have to pick apart a long, project-wide list of custom build steps – instead, I could simply delete FreeImage.ref from my project. I can also easily see which libraries are consumed by the project in my IDE:

Screenshot of Visual C++ compiling a project and automatically copying referenced binaries into the build target directory

Have fun! :)

10 thoughts to “How to Consume DLLs in Visual C++”

  1. So every “solution” that uses FreeImage will have its own copy of FreeImage? Say you have a windowing library that YOU have created and want to use in a lot of projects and solutions. Keeping a separate copy of the library with each solution makes updating it a pain!

  2. A “solution” is a Visual Studio term for a bunch of projects. You can replace “solution” with “product” if you like.

    This is all about the management of binaries from 3rd party libraries, obviously:

    The contents of the “References” folder are typically downloaded by the VCS via links to some central repository (I’m using Subversion, so the “FreeImage” folder would actually be an svn:external link pointing to https://devel.nuclex.org/external/svn/freeimage/tags/3.15.1 where I keep all version of this library organized, neat and tidy).

    Now if I was still working on said windowing library and using it in one or more solutions as test beds, then I would include the windowing library project with its sources in each solution’s development tree.

    Yes, on my hard drive, each solution’s development tree would contain a copy of the windowing library.

    There would be only one project in my VCS, however (and I would never write a library that is shared between multiple solutions without involving a VCS!). All solutions link to the project, for example by pointing to https://devel.nuclex.org/framework/svn/ui/Nuclex.UserInterface/trunk (yep, I actually wrote a windowing library :P).

    I find that a lot better than storing anything (and I mean absolutely anything) outside of a solution’s development tree:

    • If I had my windowing library in some global path and I wanted to copy my development tree to another machine, then it would become very difficult to find all the referenced libraries everywhere.
    • Same goes for backing up and restoring a solution with the specific library versions I tested it against and released it with. If the libraries and part of each solution’s development tree, I simply zip or unzip that tree. If they are in some path outside of the development tree, I have to pick them manually.
    • Maybe one solution requires version 1.0 of my windowing library while two other solutions need to be built against version 2.0 of my windowing library. If they shared the library in some global location, am I supposed to replace it back and forth all the time depending on which project I’m working on?
  3. I did not mean by what I said that the solution you described is broken, I just found it weird that you did not at least point out the “issue” that you will end up with a copy of each 3rd party (and 1st party) library for each solution that uses it, and the consequences of this duplication. Not everybody uses or needs to use VCS. I for one have yet to need it – I just use the poor lazy man’s solution: a (free) backup software to zip up my entire “projects” directory (which contains a ‘3rd party” folder for external libraries) with filters that remove unneeded files like .obj and .pdb, and I run it every few days and on project milestones. Source code compresses really well. This means that the solution gets backed up along with the windowing library and they will be compatible within the same backup zip file.

    Also, “copy my development tree to another machine” can be a rare activity. In my ~10 years of experience I’ve only done it maybe 3 times.

    I openly admit that all of the points you mentioned are valid, and that this blog post is rather very good and well-illustrated, but like I said, what works for one programmer (or team) may not work or appeal to another.

  4. Thanks for explaining your way of doing things, too — it sounded a bit like you disagreed with everything I said :)

    Anyway, don’t you have some old projects around which require an achieved version of some library you’ve written? Or do you always keep every project compatible with the latest version of every other project it references?

    I find using a VCS to be the pragmatic choice because I wouldn’t want to completely change the way I manage my sources the moment I invite someone else to work on a project with me together.

    Most importantly, I run a continuous integration server which monitors my VCS and automatically compiles any code I commit (see https://devel.nuclex.org/jenkins/). This way, I always have up-to-date binaries of my projects. In case I modify a library and break something in any of the projects that consume it, I get an email telling me so within 5 minutes.

    My daily workflow is probably not that different from yours: I open my IDE, code away for a while and instead of running a backup.cmd / backup.sh, I type “svn commit” / “git push”.

  5. This has been very helpful. I am a mostly-Unix programmer, and I’ve only dealt with C on Windows a few times. This post clears up a lot of things that are glossed over in the official docs: it fills in the why.

    I’m actually planning to do everything with Makefiles, but the point about including the .lib files locally is crucial either way.

    On Unix you only need a .h and a built copy of the DLL to build an executable. I am curious, what would you do if you didn’t have the sources to your libraries? Do Windows libraries generally come with prebuilt .lib files?

  6. Most Windows libraries do ship with .lib files. But like in Unix, there are three ways of linking:

    1. A .lib file that contains the actual object code as a static library, like .a on Unix – no .dll needed.
    2. A .lib file that contains stubs that load and call function in a .dll, like compile-time linking to a .so on Unix. Also the only way to link C++ DLLs (like OpenCV since 3.00) without being exposed to the compiler’s name mangling.
    3. Just a .dll file. In this case the programmer has to use LoadLibrary() (equivalent to dlopen()) and GetProcAddress() (equivalent to dlsym()) to get the function adresses.

    But Method 2 is by far the most common for all but the smallest libraries. If you look for prebuilt Windows binaries of popular libraries, you’ll generally find a package containing a set of .lib/.dll files for your Windows compiler :-)

  7. I think it is not a good practice to install, configure the whole Third Party Library for all development machines, espacially if you use only a part of the Third Party Library.
    It help me a lot to understand how can achieve this, Thanks.

  8. Thanks for this!
    I was looking for a way to use a .dll without actually copying it into my project folder. Once you wrote the script to copy the dlls into your project folder, I inferred that that was the only way. There is a way to globally include directories where you can put all your dlls. But those directories will apply for all your visual studio projects. I was really looking for a project specific method. Copying the dlls fits that requirement, though I wish there was a more elegant way of doing things.

  9. Hello,
    i’m using duilib library for design ui in c++ desktop project and i’m new in c++ development and i got runtime etrror like : the procedure entry point ? setpadding @CControlUI@Dulib@@UAEXUItagRECT@@@Zcould not be located in the dynamic link library [my project path of .exe file] ,Help meplease

    thank you.

Leave a Reply

Your email address will not be published. Required fields are marked *

Please copy the string cCBuen to the field below:

This site uses Akismet to reduce spam. Learn how your comment data is processed.