Yesterday, I published a small guide on how to consume DLLs in Visual C++ that explained how to best integrate a third-party library into a Visual C++ project. This is a follow-up article for Visual Studio 11 Beta users that contains the additional steps required to consume a normal (non WinRT Component) DLL in a WinRT/Metro project.
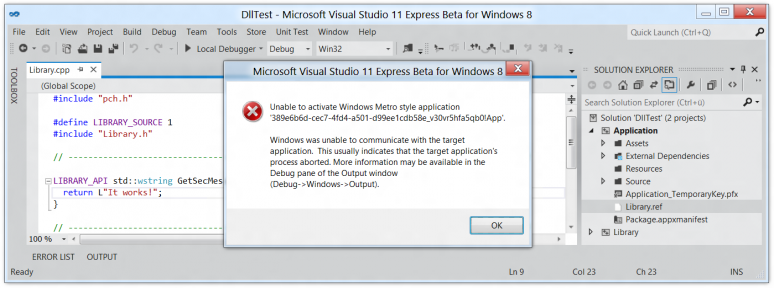
Assuming you have the DLL integrated into a WinRT application project as explained in my previous blog post, you will notice that when you try to run the application, there will be an error message stating that the Windows Metro style application could not be activated and the output window will report a missing dependency:
The reason for the error is that unlike desktop applications, a WinRT/Metro application is "deployed": packaged, sent to your installed app repository and remotely launched, not unlike what happens when you write a Windows Phone or Xbox application. The library DLL will simply not be part of the deployed files, even though it is in the project’s output directory.
Adding the DLL to Your Project
To solve this, you have to make the compiled DLL a part of the project. This creates a problem, because the compiled DLL will be in different directories, depending on whether you are compiling a Debug or a Release build and whether you are building for x86 or x64. Luckily, Visual C++ project files are based on MSBuild, an XML-based build scripting language.
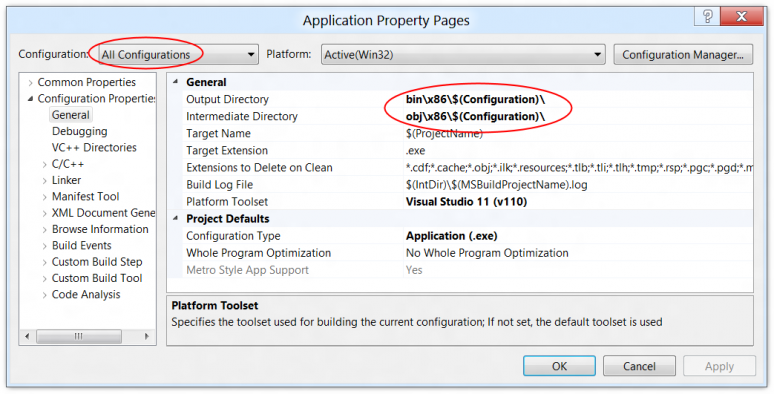
Here’s what I did: first, I changed the output directories of my DLL project and my application to sane (and identical) values since the defaults appear rather arbitrary to me:
Using the $(Configuration) variable, the properties can be identical for the Debug and Release configurations, but I still needed to enter them 3 times, once for each target platform supported by my project:
| Platform | Output Directory | Intermediate Directory |
|---|---|---|
| Win32 | bin\x86\$(Configuration) | obj\x86\$(Configuration) |
| x64 | bin\x64\$(Configuration) | obj\x64\$(Configuration) |
| ARM | bin\arm\$(Configuration) | obj\arm\$(Configuration) |
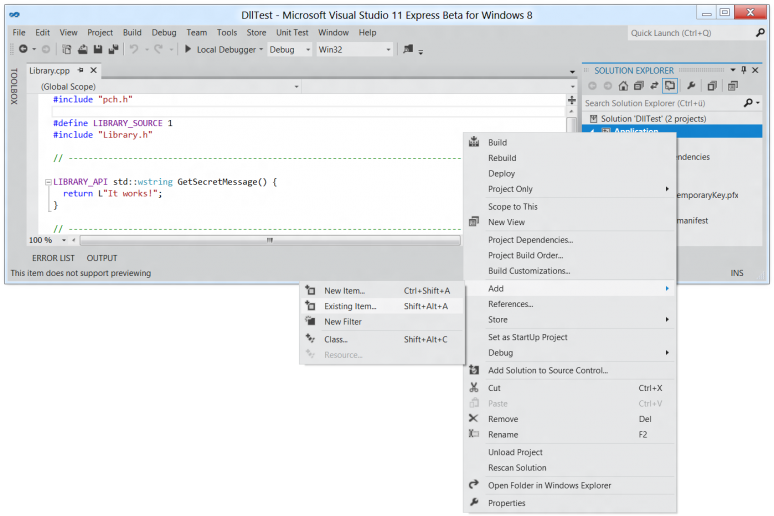
Next, I did a single build (any configuration is okay) and added the created DLL from my library project to my application project:
I then closed Visual Studio and edited the .vcxproj file
of my application project via Notepad to use MSBuild’s OutDir variable
instead of the fixed path:
<ItemGroup>
  <CustomBuild Include="..\Library\$(OutDir)Library.dll">
  </CustomBuild>
</ItemGroup>
Yep, that works perfectly and Visual Studio also handles it nicely.
Deploying the DLL with Your Project
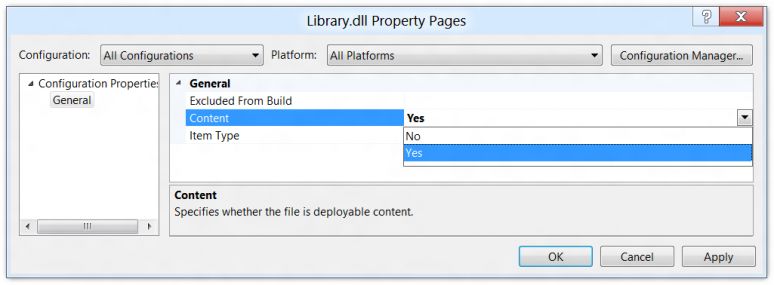
The next step is to configure the DLL to be deployed together with your project. This is rather easy: right-click the DLL, select "Properties" and set the file’s "Content" property to true:
If you’ve done everything as described, pressing F5 should now successfully execute the application and its library!
Optional: Remove .ref File
I could stop here, but now I have both a .ref and a .dll file for the library in my project. I can as well attach the custom build steps (see previous blog post) to the .dll file instead and remove the .ref
Here’s an example solution with containing an application and a DLL consumed by the application:
Possible Errors
If you are overly zealous in cleaning up build artifacts from your projects (I am!), you might run into the following error message:
Error    1    Error : DEP0600 : The following unexpected error occurred during deployment:
Illegal characters in path.
at System.IO.Path.CheckInvalidPathChars(String path, Boolean checkAdditional)
at System.IO.Path.Combine(String path1, String path2)
at Microsoft.VisualStudio.ImmersiveProjectServices.Shared.AppxLayoutManager.CheckPackageLayoutState(DeployPackageName deployPackageName, String location)
at Microsoft.VisualStudio.ImmersiveProjectServices.Shared.LocalDeployJob.GetLayoutState(DeployPackageName deployName, Boolean hasFrameworkDependencies)
at Microsoft.VisualStudio.ImmersiveProjectServices.Shared.RegisterAppxLayout.Start(Boolean forceNewLayout, Boolean forceRegistration, NetworkLoopbackState desiredNetworkLoopbackState, Boolean refreshLayoutOnly, String& packageMoniker, String& firstUserAppID, Exception& deployException)
If this happens, it means that your application is already registered in the WinRT/Metro app repository, but Visual Studio has lost the registration information (or something at least) which was stored in one of those intermediate directories.
To solve it, press Windows+Q (shows all installed applications), right-click on your application and pick "uninstall". After that, deployment should succeed again.
If the error persists, open your app’s Package.appxmanifest, navigate to the "Packaging" tab and enter a new Guid for the "Package Name". That way, your project gets a new identity and whatever is left in the WinRT/Metro app repository has no connection (and therefore won’t block) your app anymore.


